School website service training and support logo

School website service training and support

School website service training and support

Google calendar

Use this guide to learn how to add a Google calendar to a page.

Features

  • The Google calendar script automatically updates the script with any changes made on the Google calendar.
  • For example: When you create a new event in Google calendar, it will be synced and automatically updated directly onto the Google Calendar on your school's website.

Before you start

  • After setting up a google account, the first step is to find the Google calendar script to embed into your school's website. 
  • It is important that you check that you are using a complete script. Using an incomplete or incorrect script may break your page.
  • The second step is to create the page and copy the Google calendar script into the script component. 
  • Adding the Google calendar to your homepage is the same process. We recommend that you create the calendar on a new page to check it works correctly before copying the component to your homepage.
  • We will guide you through these steps on this page.

Step 1: Navigate to Google calendar

  • Go to Google calendar.
  • If you have already copied your Google calendar code, skip to Step 6.
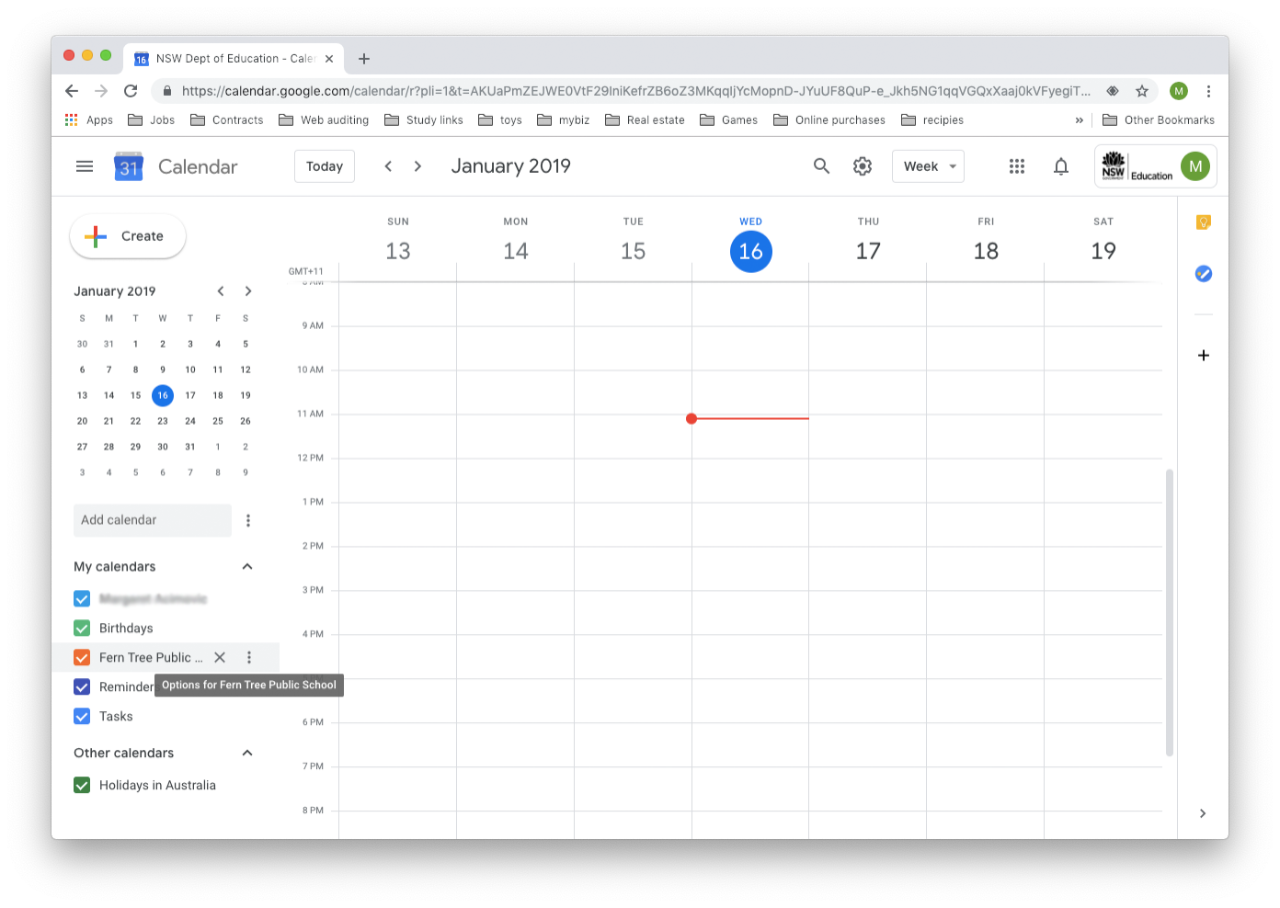
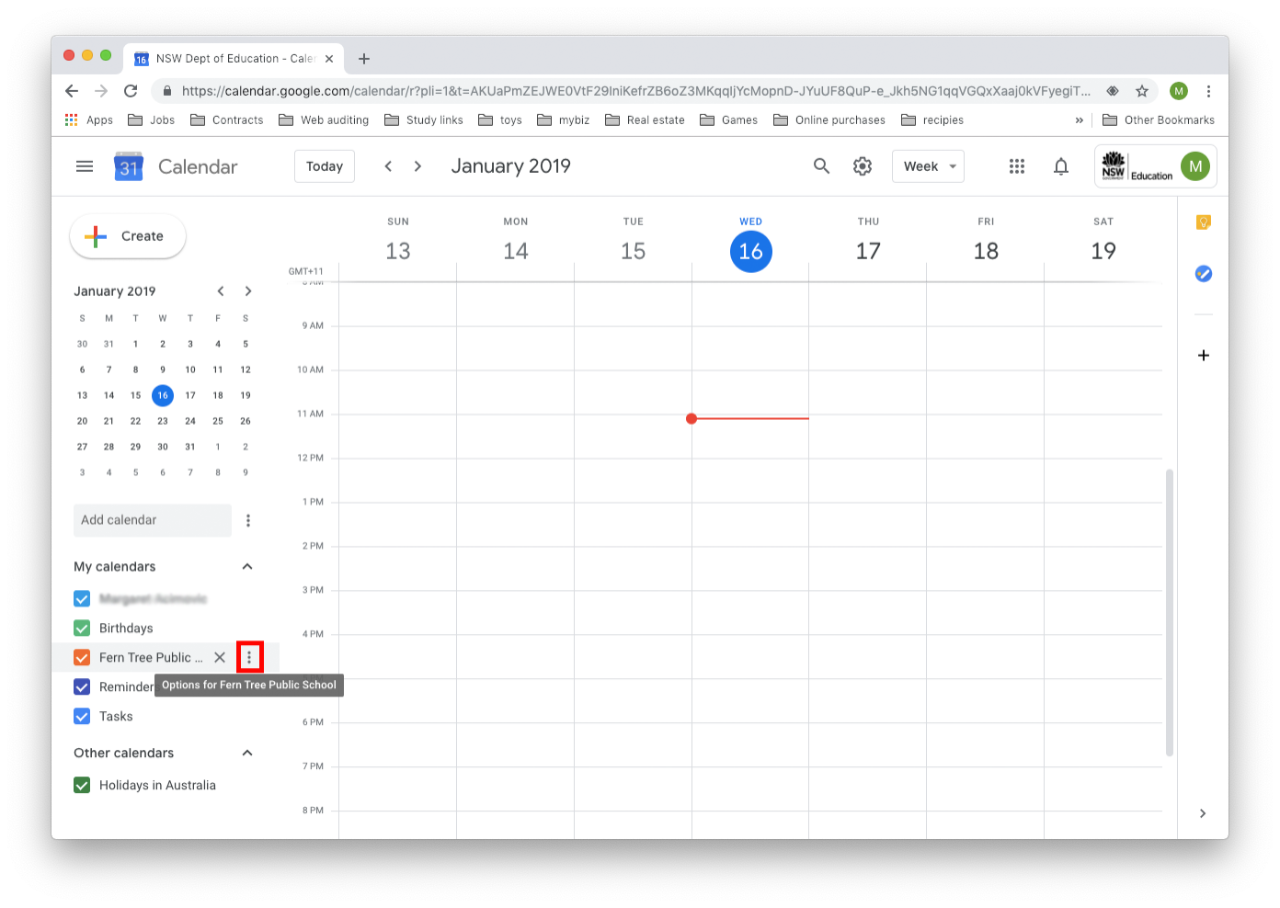
  • Hover your mouse over the name of the Google calendar in the left sidebar menu. 

  • Select the ellipsis on the Google calendar you wish to integrate into Adobe Experience Manager.

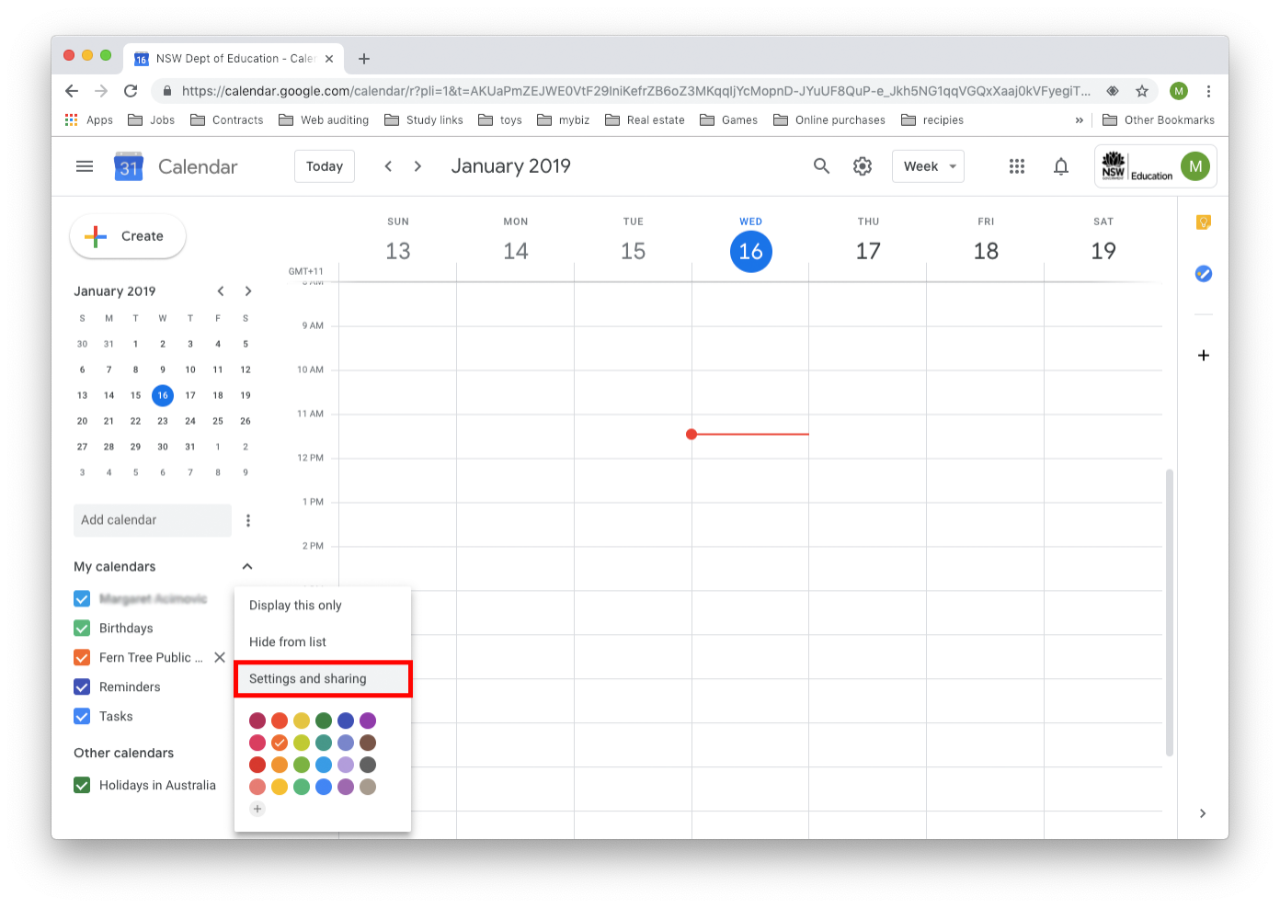
  • Select Settings and sharing.

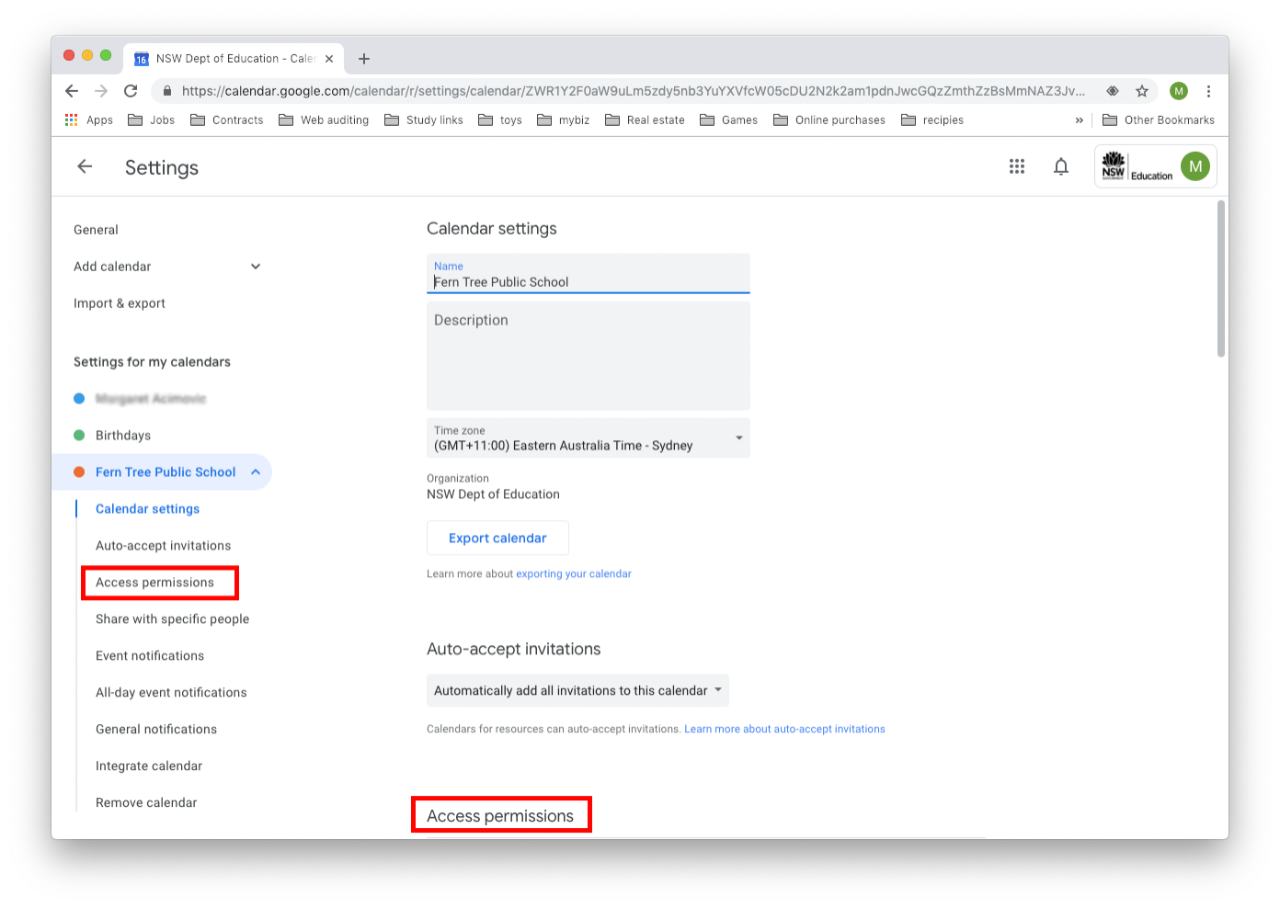
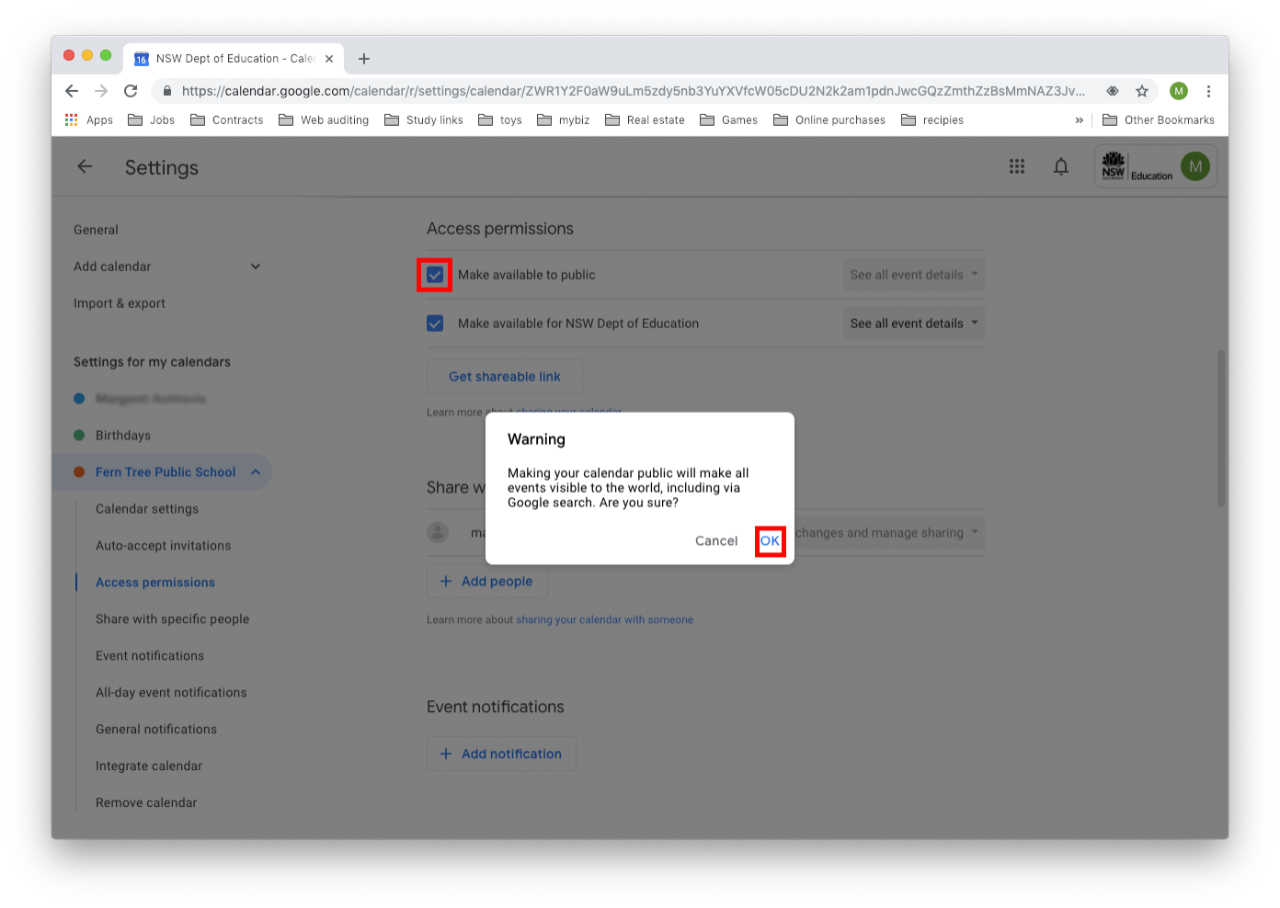
  • Scroll down to the heading Access permissions or select it from the sidebar on the left.

Step 2: Make the Google calendar public

  • Select the Make available to public button. 
  • A warning box will appear explaining the Google calendar will be made public for everyone to view.
  • Select Ok.

Step 3: Copy the Google calendar script

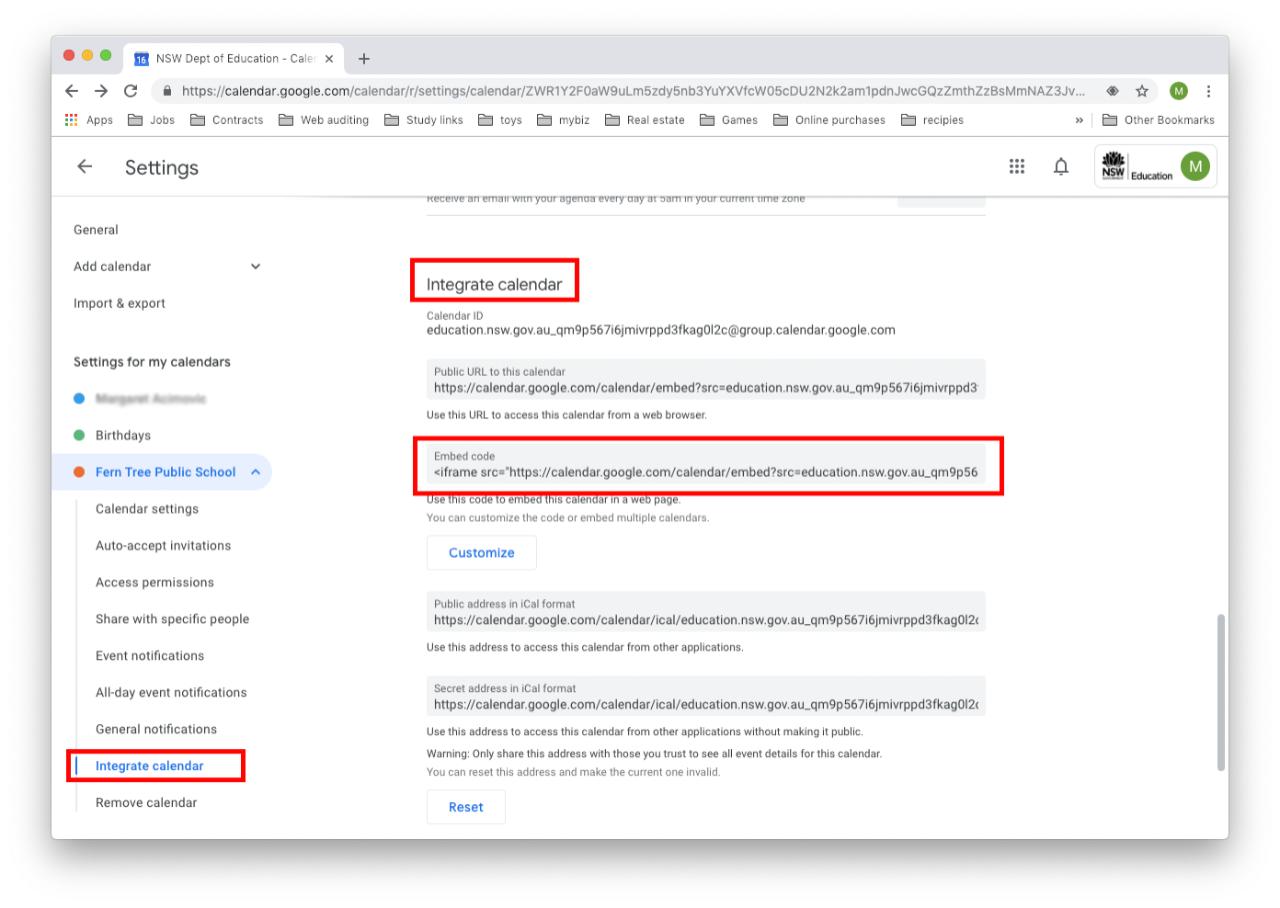
  • Scroll down to Integrate calendar or select it from the sidebar on the left. 
  • Find the Embed code. This is the script you will need to put into the script component on Adobe Experience Manager. 
  • Select and highlight the text. 
  • Copy the text. 

Step 4: Customise the Google calendar – optional

  • The Google calendar can be customised to change the display, colour, icons and view. 
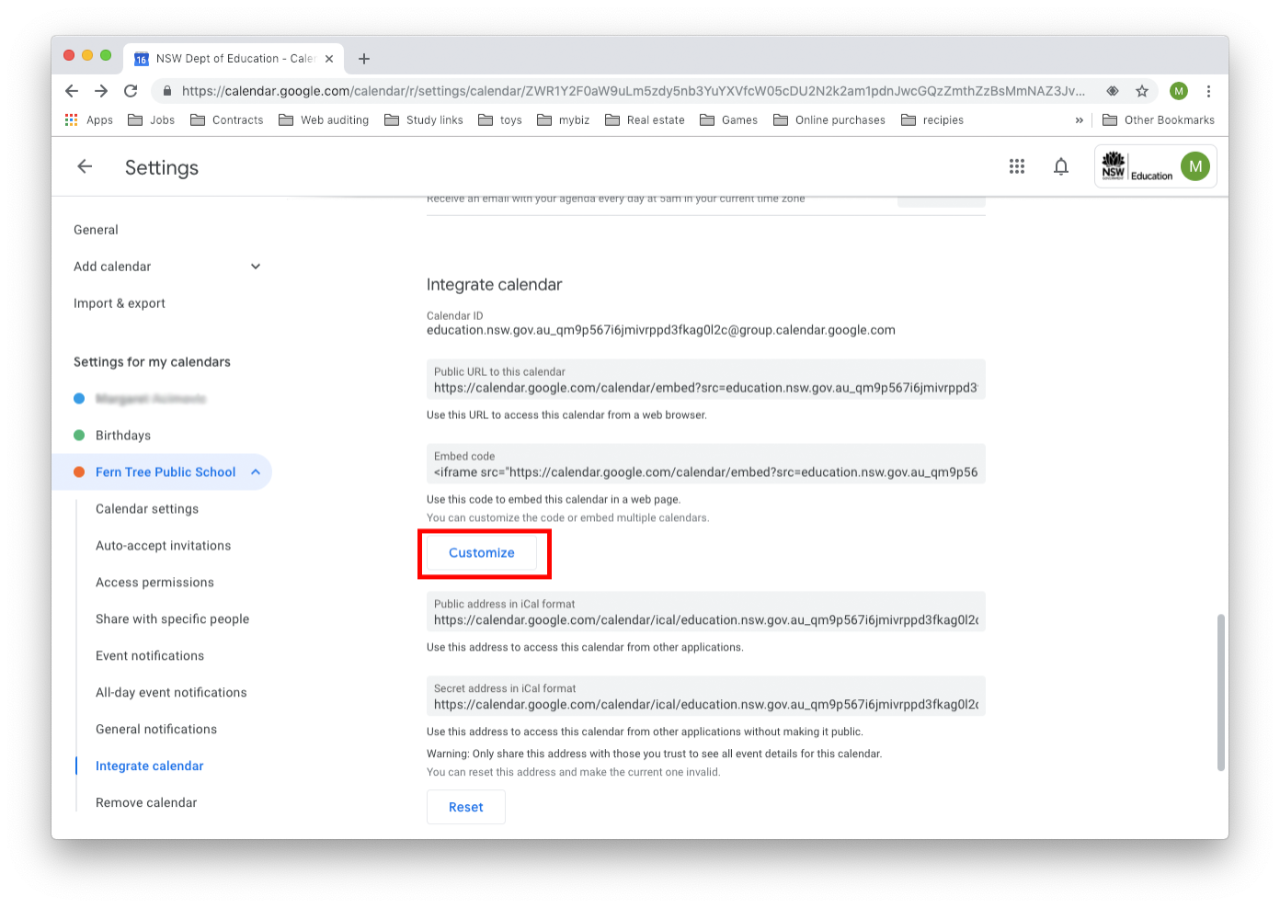
  • Select the Customise button if you wish to change the look of the calendar. 
  • The customise page will open in a new tab.

Options for customising your Google calendar

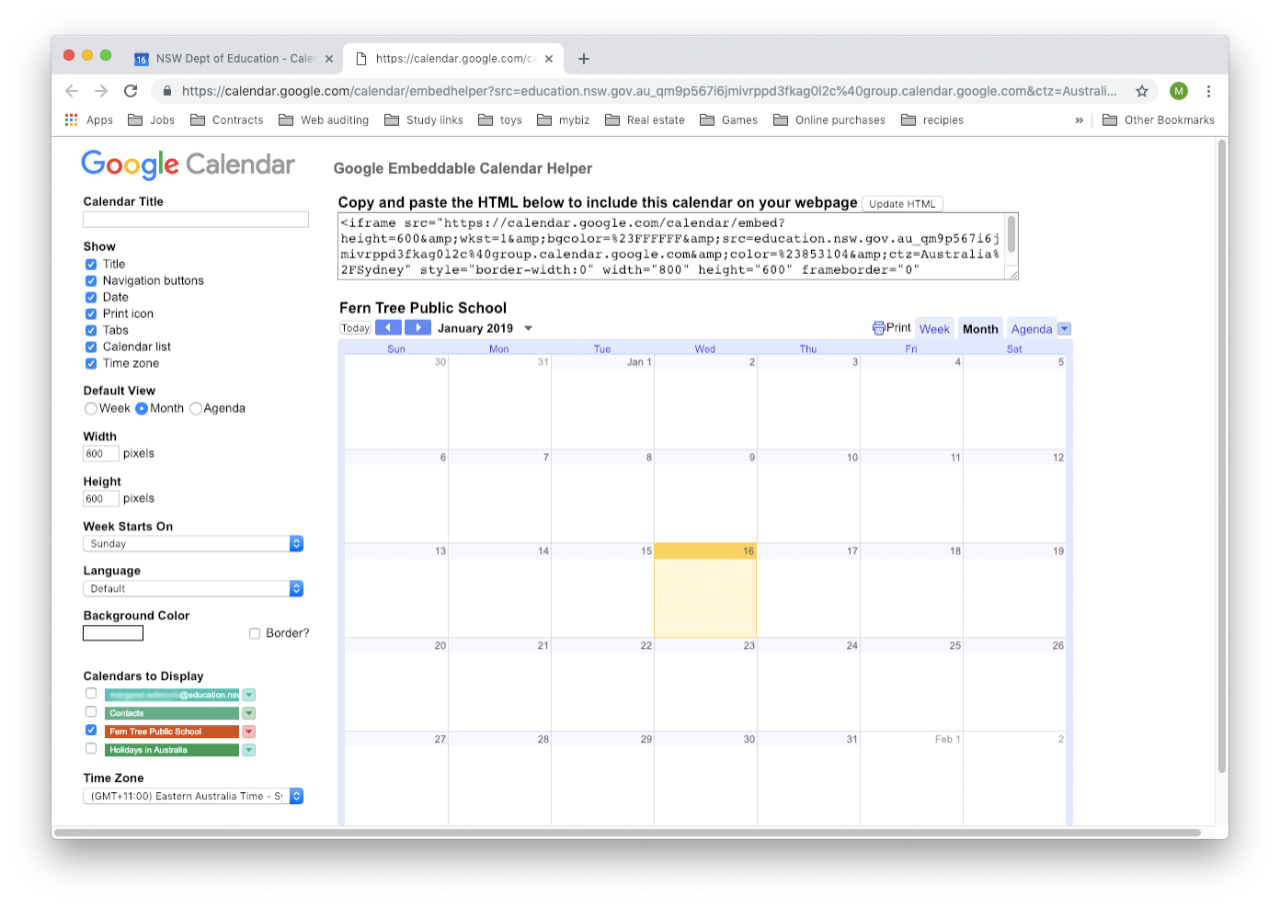
The Google calendar will automatically show: 

  • Title
  • Navigation buttons 
  • Date
  • Print icon
  • Tabs - allow user to change the display to Week, Month or Agenda
  • Calendar list - if there is only one calendar deselect, only required for multiple calendars
  • Time zone.

The default view for the Google calendar is Month. This can be changed to Week or Agenda.

The width and height can be changed to change the size of your calendar. 

The first day of the week can be changed to Monday, Saturday or Sunday. 

The language can be changed from English to any other language offered.

The background colour can be changed to match your school colours and you can also choose to add a border.

Background Colour can be set if you want to match it to your school colours. You can add a border but generally leave this unselected.

Step 5: Update the script

  • If you have customised the Google calendar, you must re-copy the script. 
  • To re-copy the script, select Update HTML at the top of the page.
  • Select and highlight all of the text in the box.
  • Copy the text.
  • This is now the code you will use in the script component.

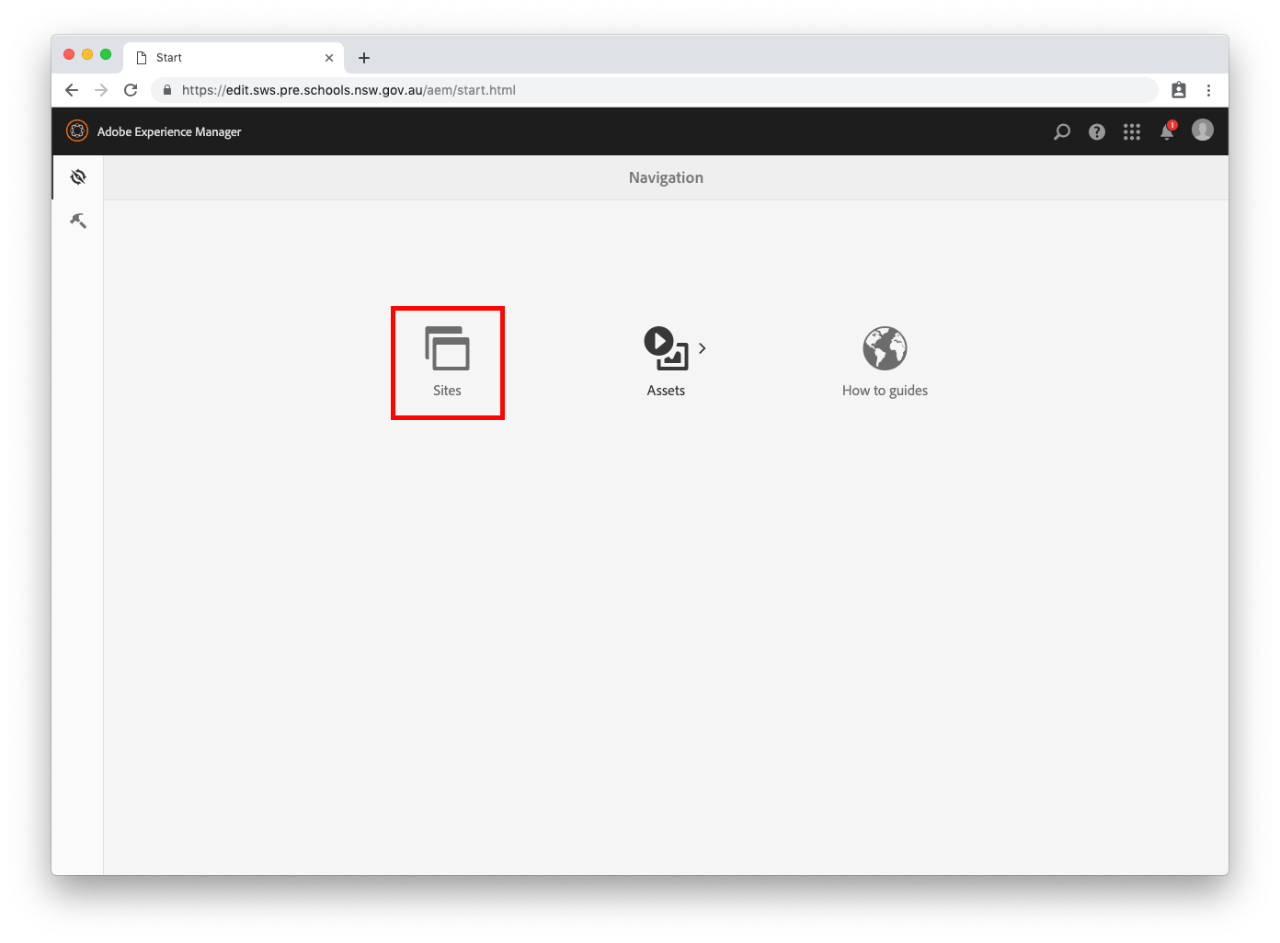
Step 6: Navigate to Sites

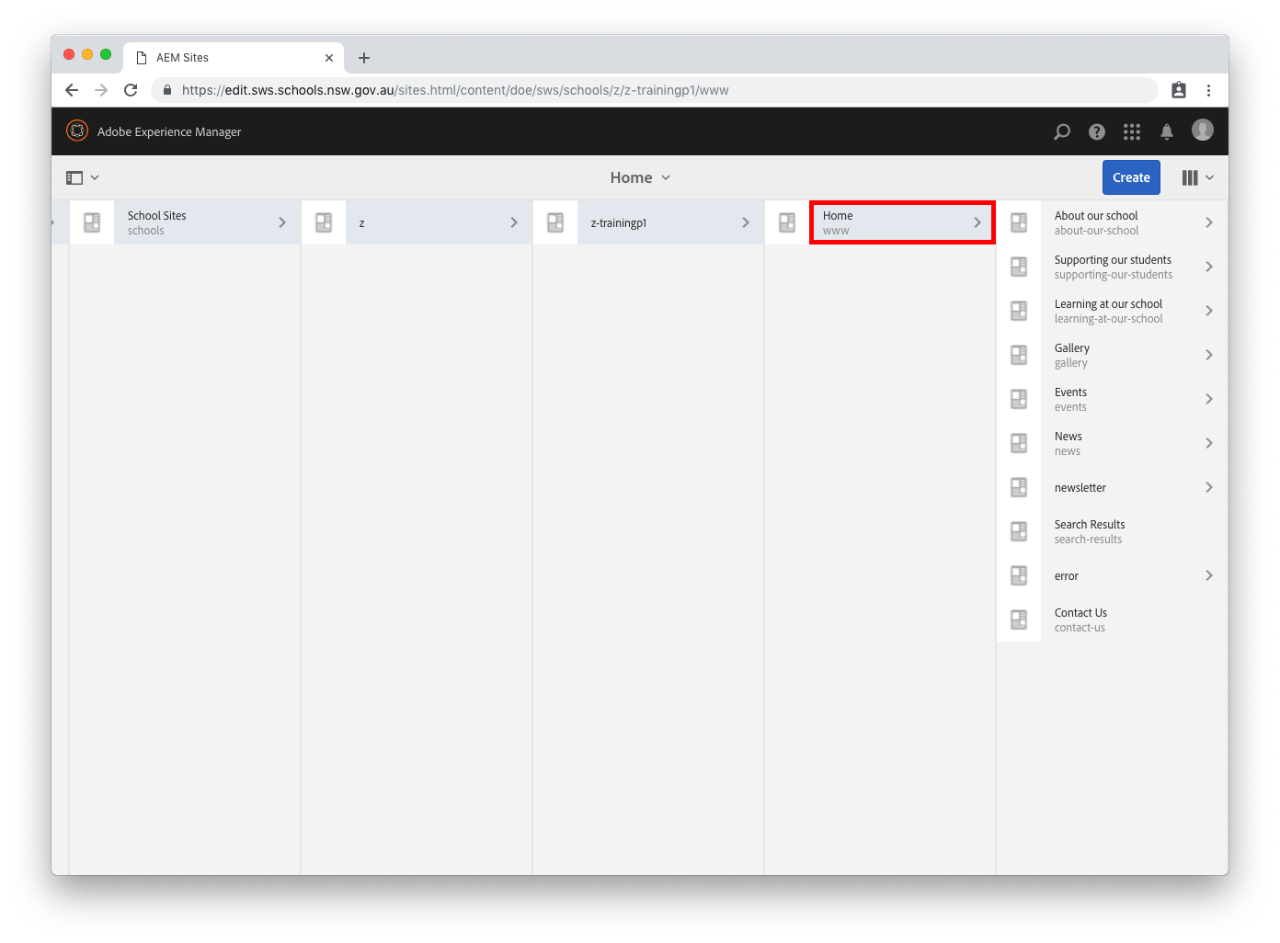
  • Select Department of Education > School Web Services > School Sites.
  • Select the letter that corresponds to the first letter of your school.
  • Select your school.
  • Select Home.

Step 7: Create a new page

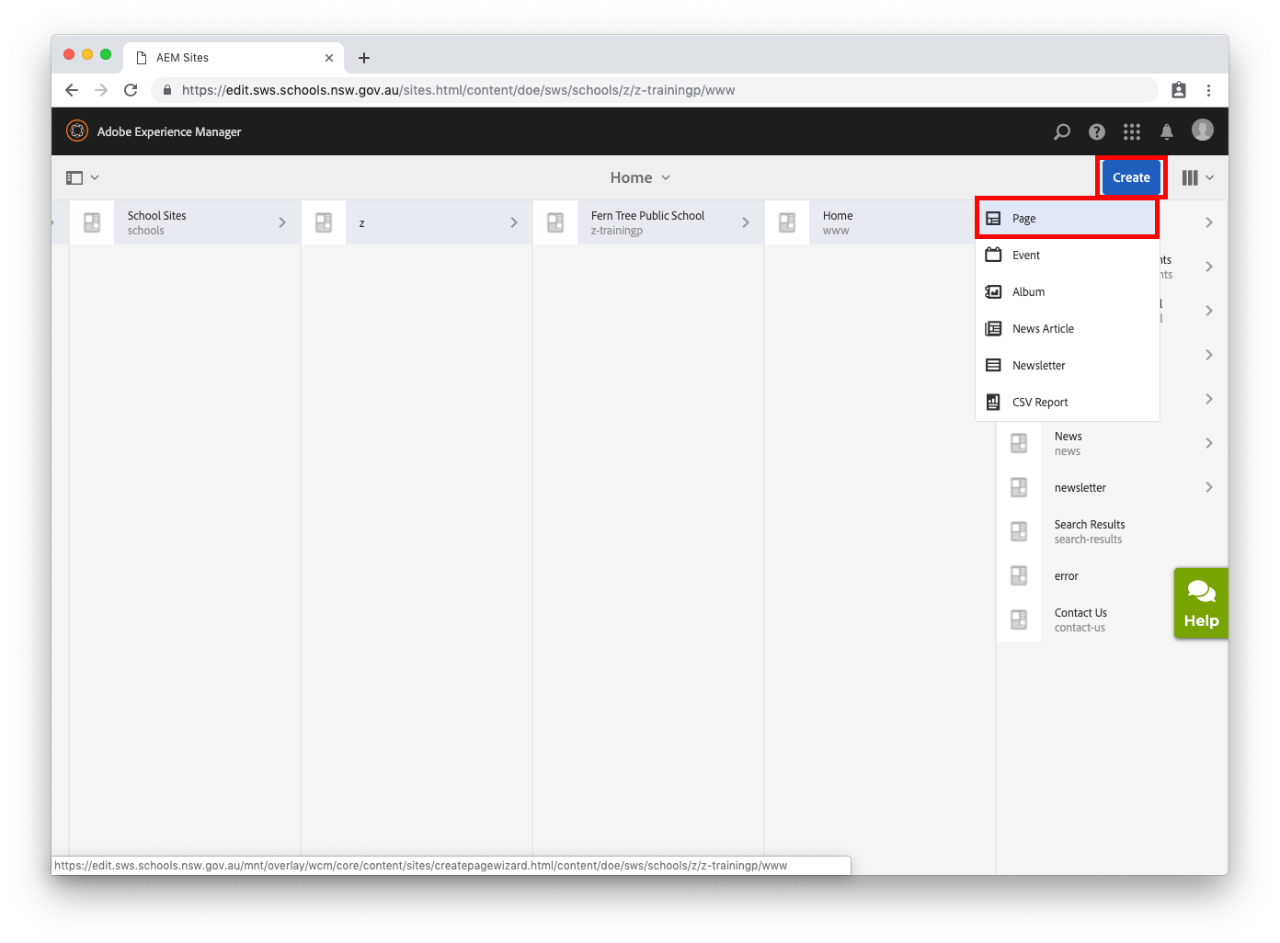
  • Select the existing page you would like your new page to sit below. Do not select the icon next to the page with the tick. For example: This new page will be a child page of Home.
  • Select Create in the top right hand corner.
  • The Create drop-down menu will display.
  • Select Page.

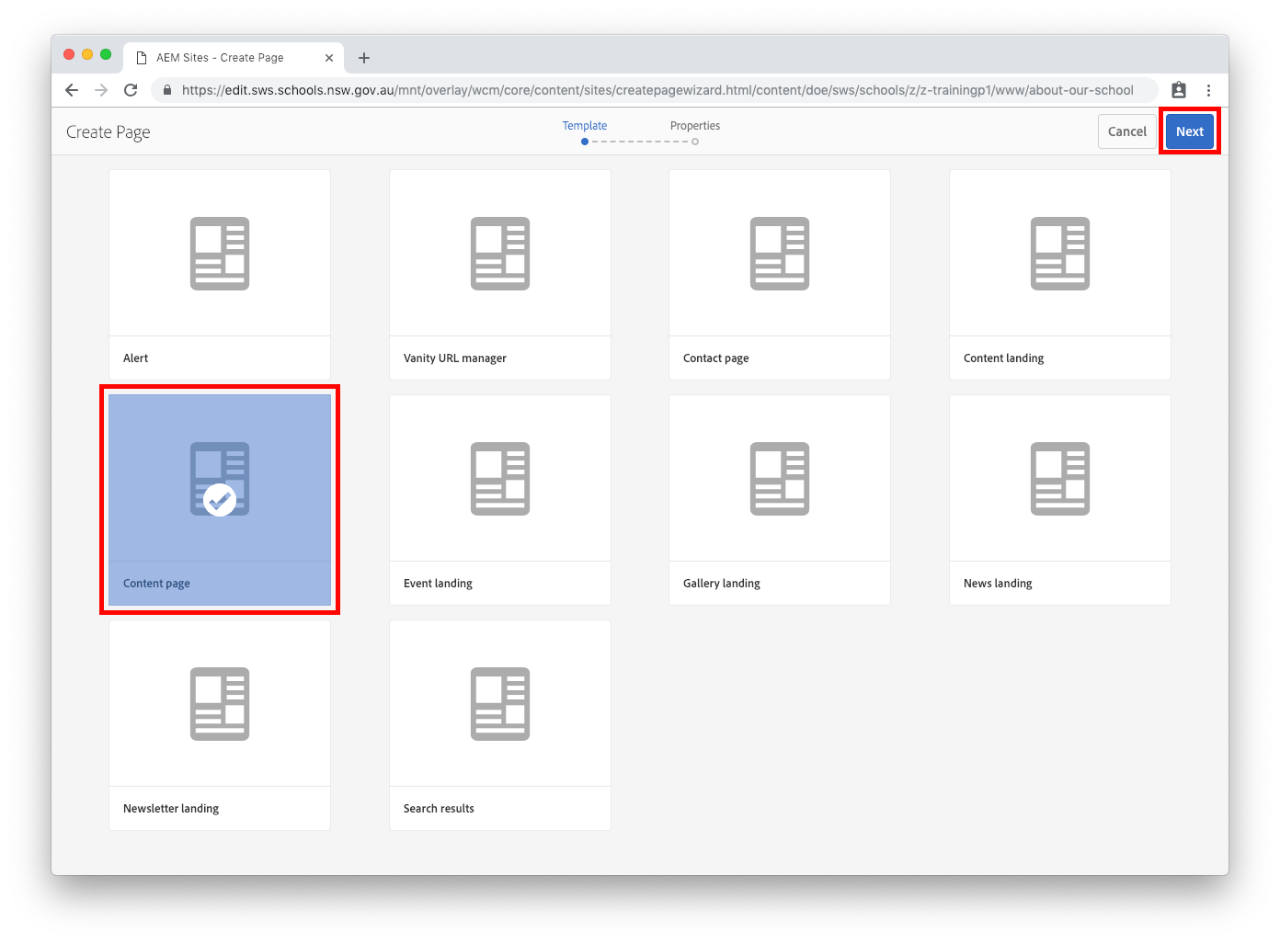
Step 8: Choose a template

  • Select Content page template.
  • Select Next.

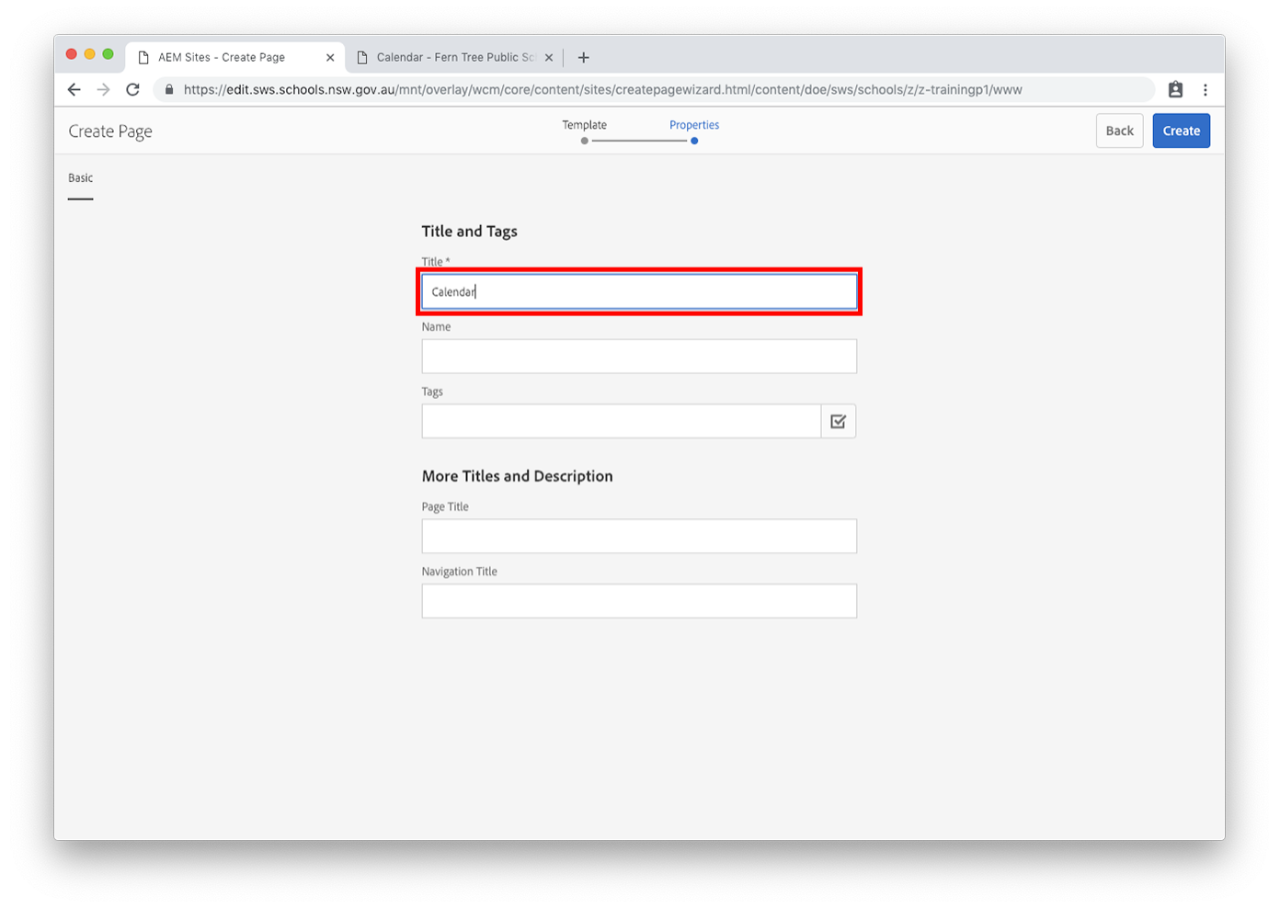
Step 9: Enter the page title

  • Enter the Title of your new page. This title will be used on the page, in the URL and in the navigation menu. For example: Calendar
  • Do not fill out any other fields.
  • Select Create.

Step 10: Open your page

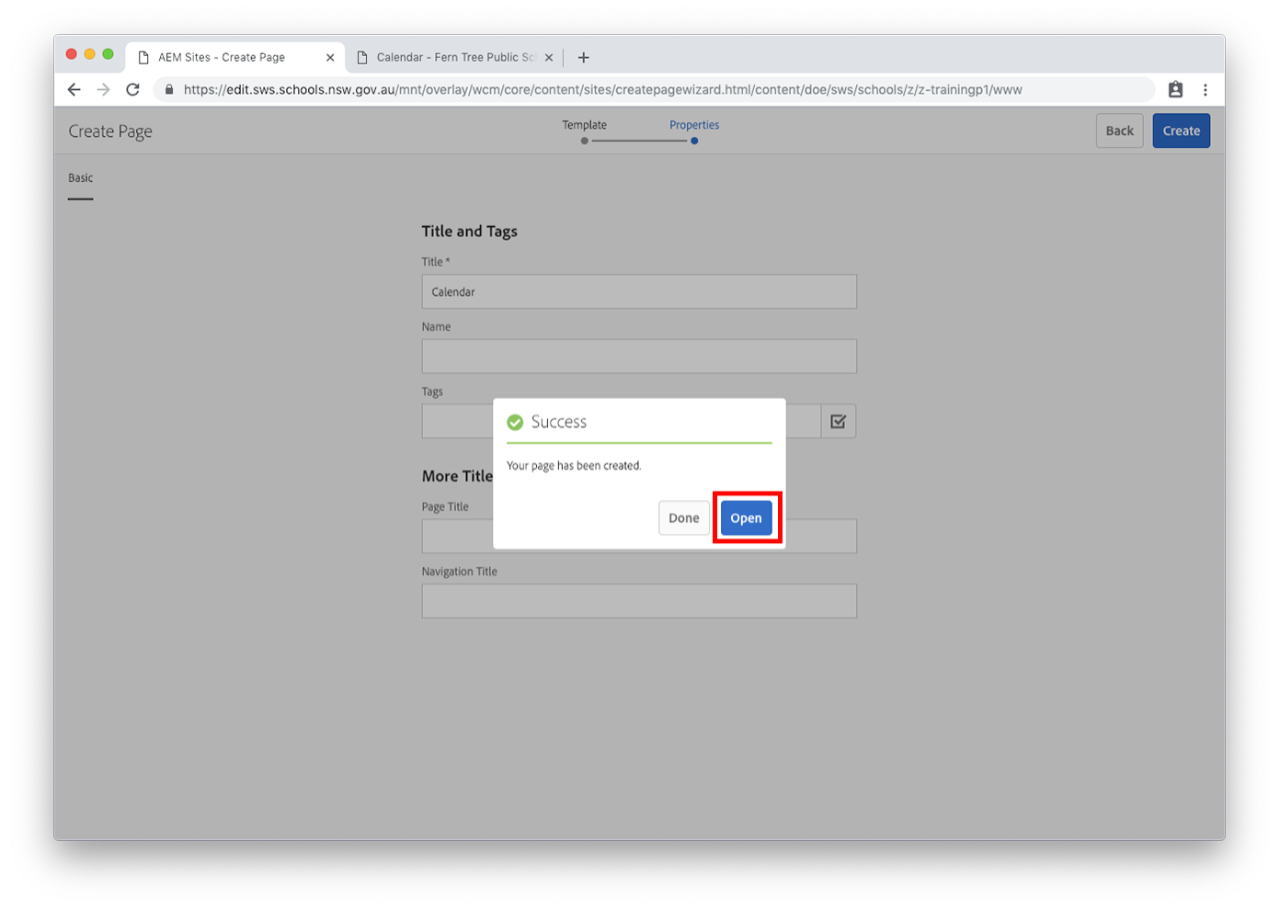
  • A success message will appear once the page is created.
  • Select Open to edit the page.
  • If you select Done, you will need to edit your page later.

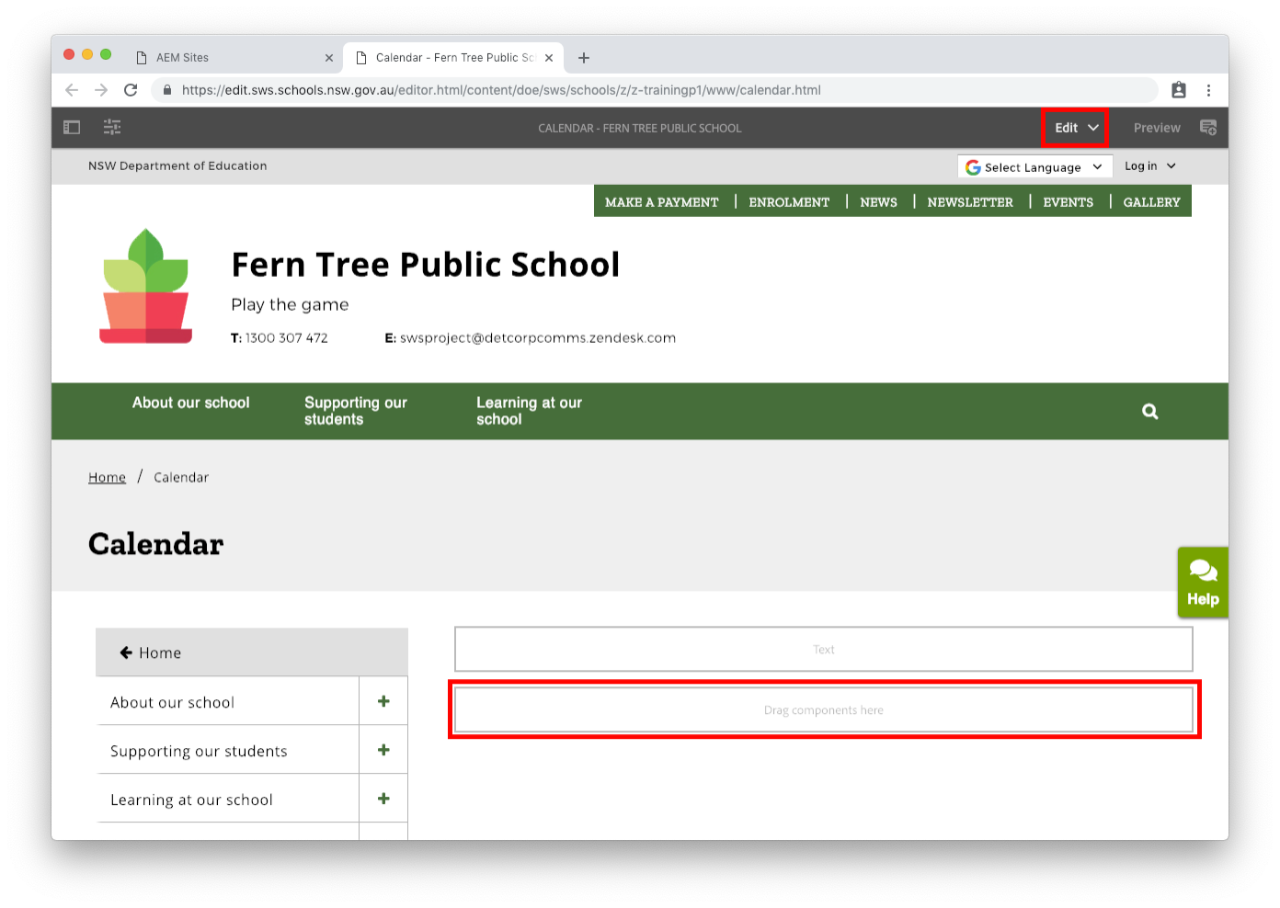
Step 11: Edit your page

  • Select Edit in the top right of the page. This button is next to Preview.

Step 12: Add script component

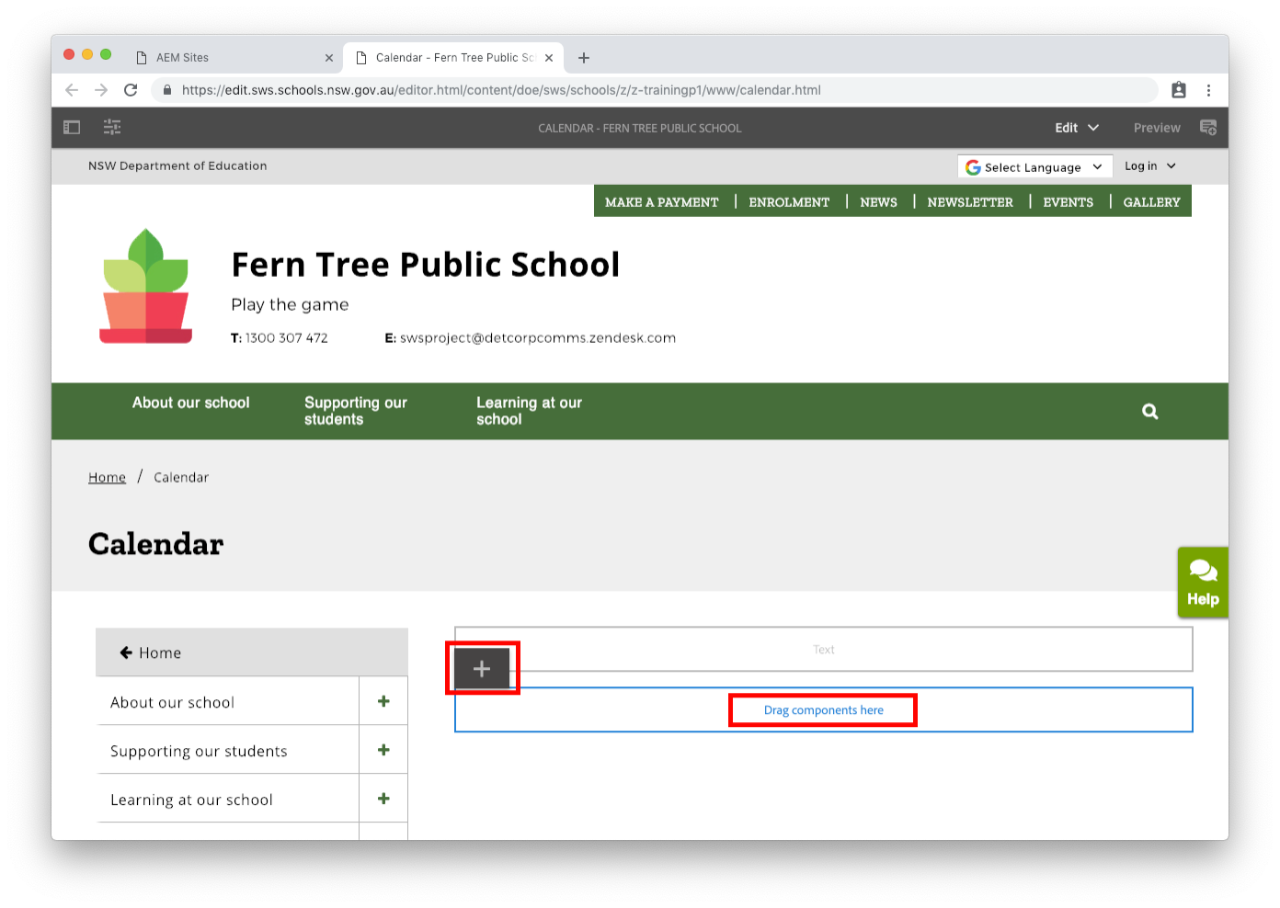
  • Select Drag components here.
  • Select the plus icon.

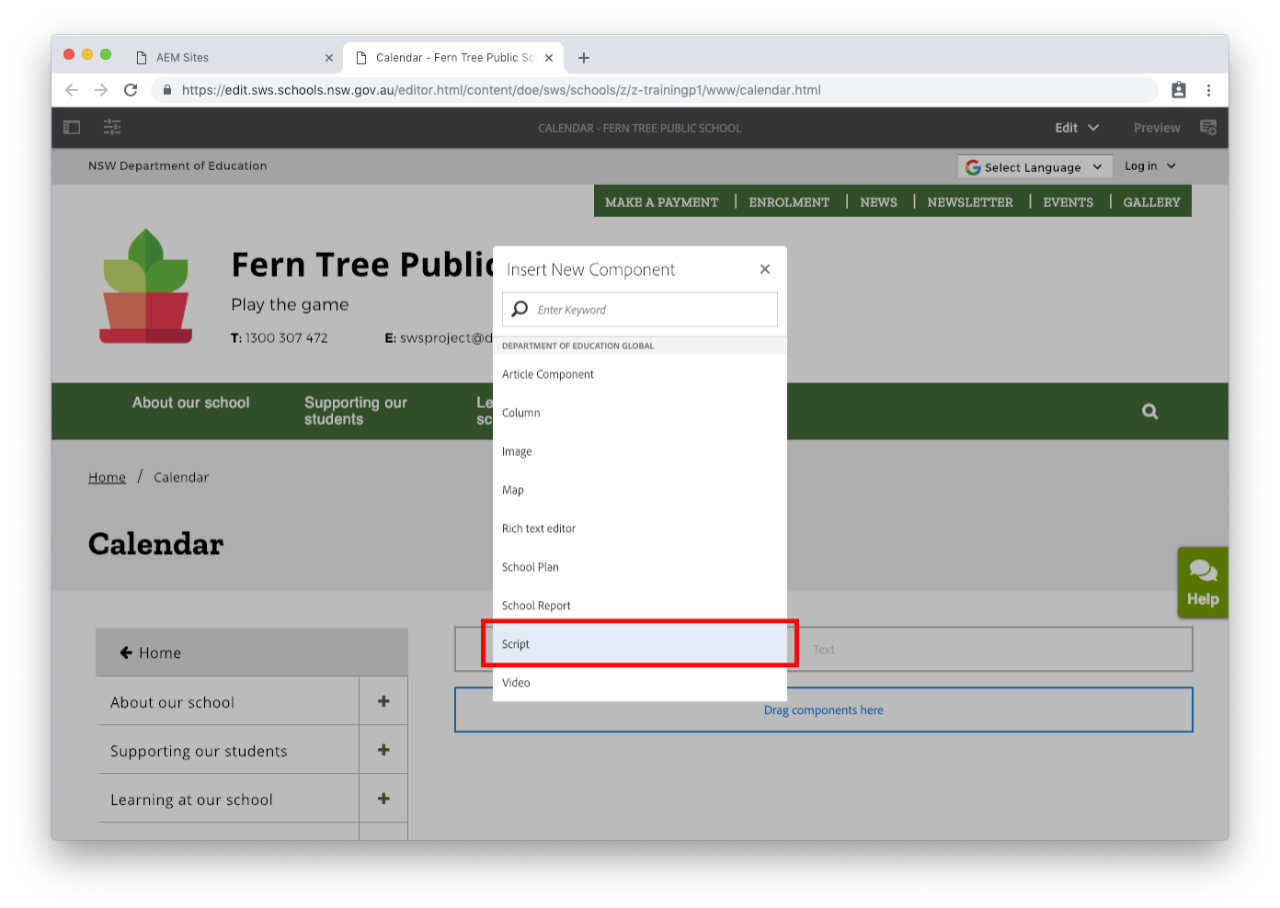
  • Select Script from the Insert New Component list.
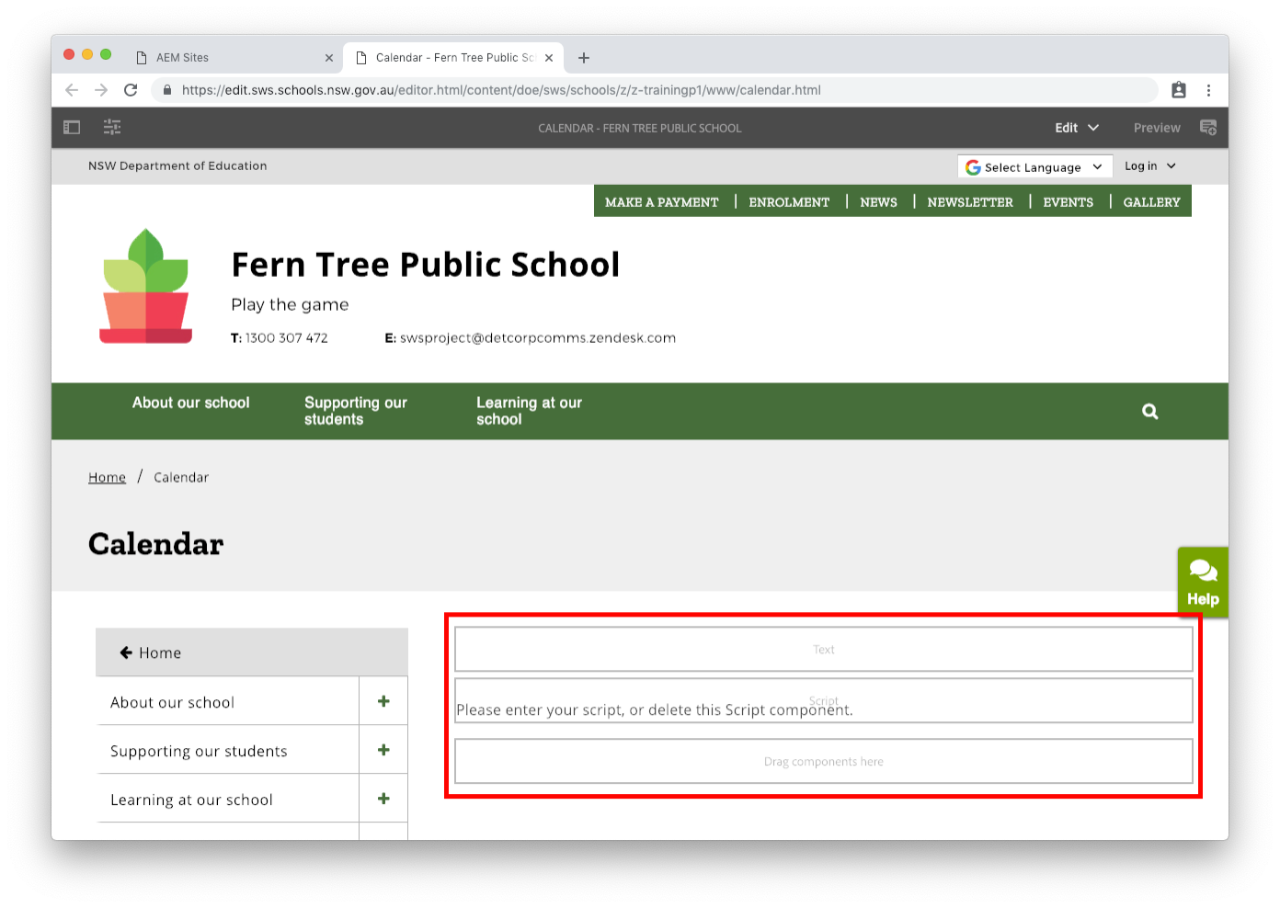
  • Script components that you add will be outlined in blue. The words 'Script' also appear in the bottom right corner of the box.

  • A Script component will appear on the page. A Rich text editor component may also appear.


  • If the Rich text editor component appears, write a small introduction explaining what the calendar is. 
  • For example: Fern Tree Public School uses a Google calendar to keep parents, carers and students informed on upcoming events, news and activities.

Step 13: Add text or script in the components

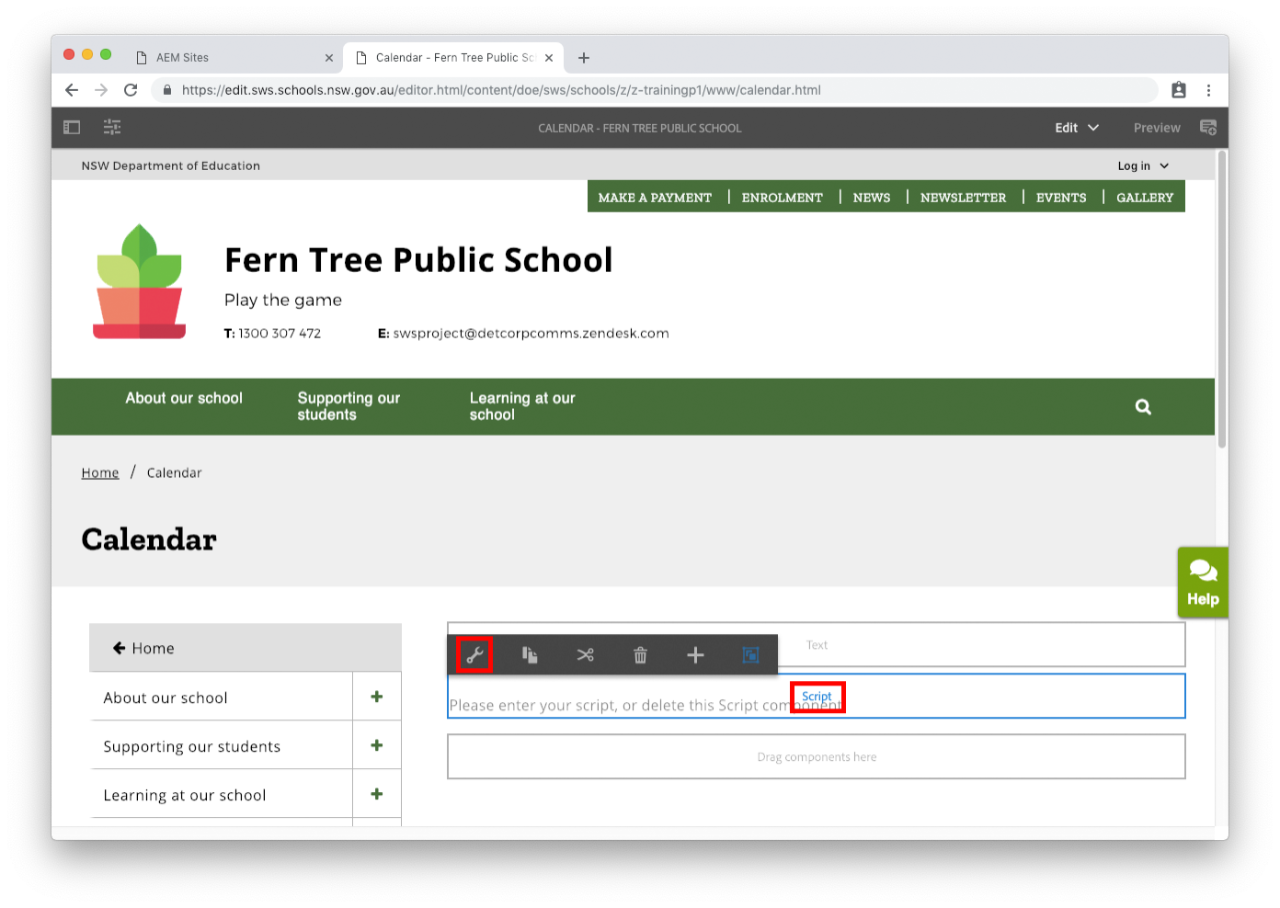
  • Select the Rich text editor to add text or the Script to add the Google calendar script.
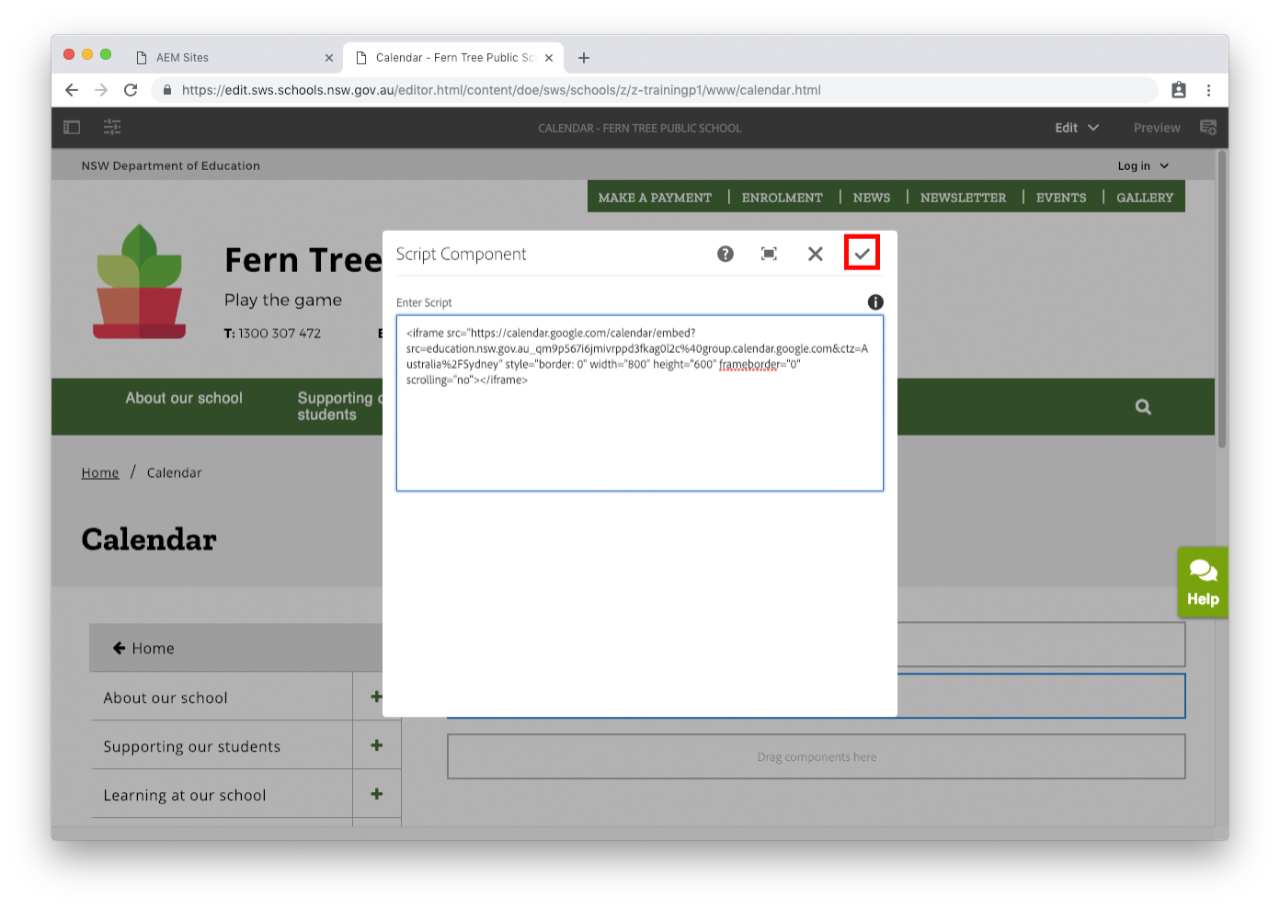
  • Select the spanner icon. This is the Configure button.
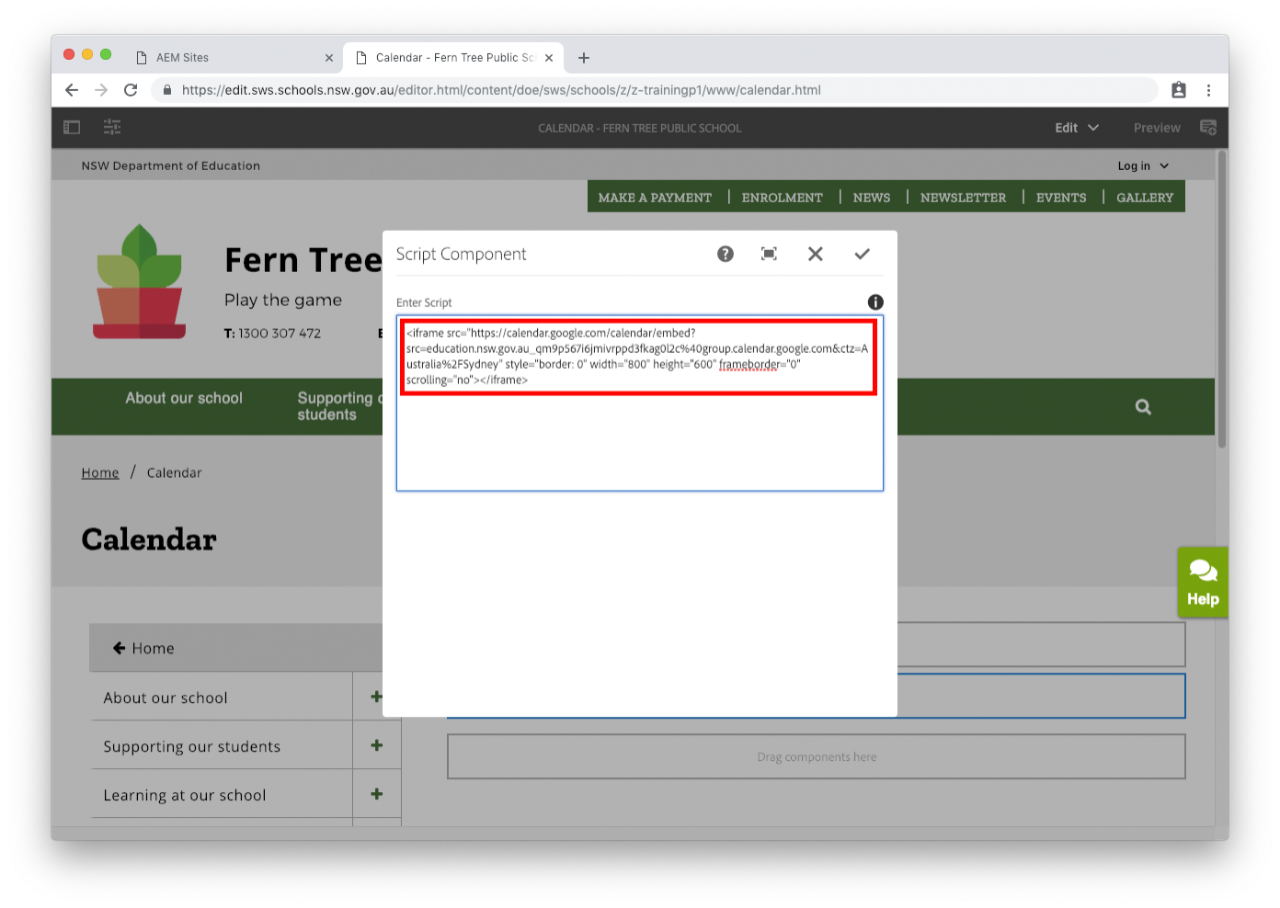
  • If you have the Google calendar script code, paste the code into the component.

Step 14: Review the script

  • Select the tick icon in the top right to close the Script component.
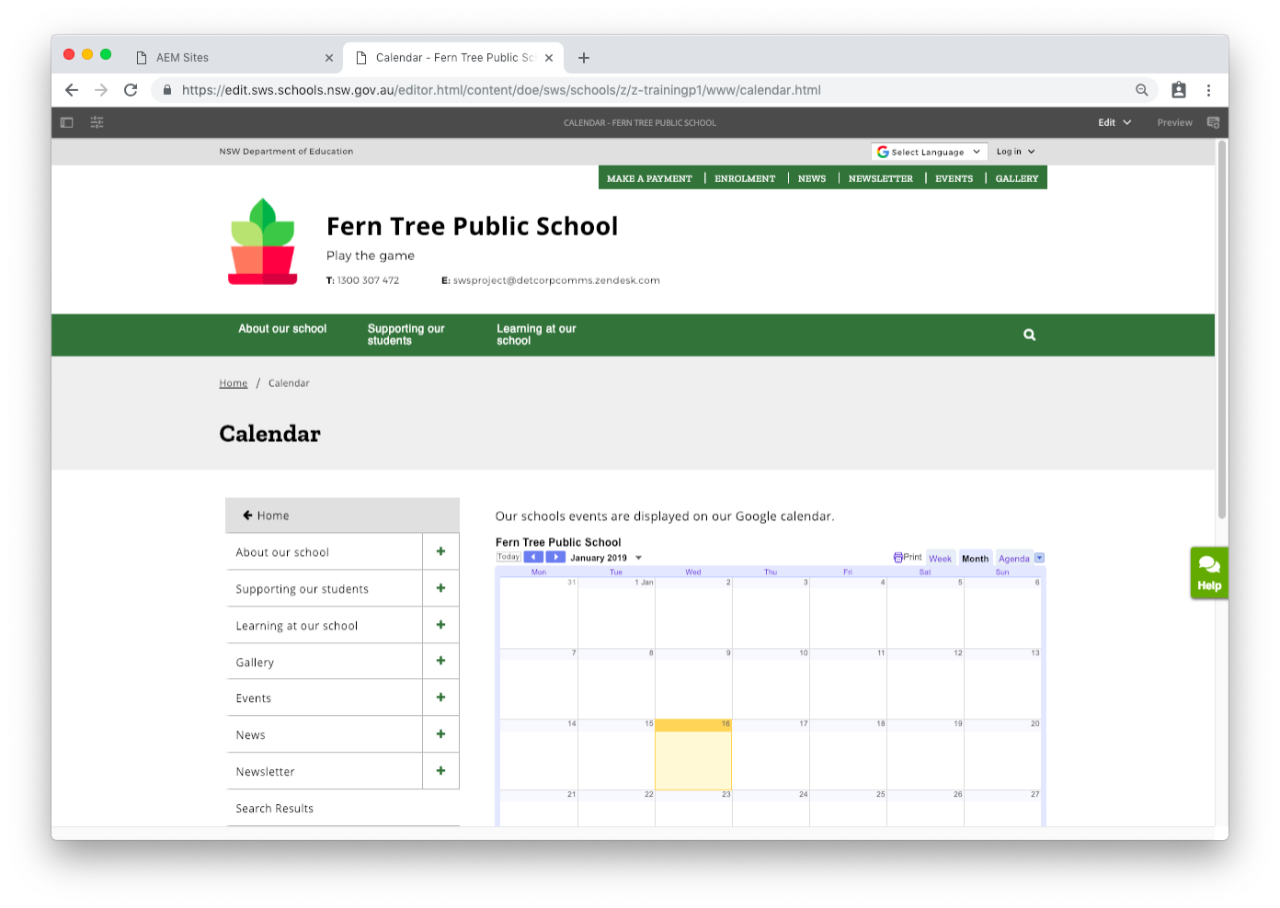
  • The Google calendar is now on the page.

  • If the Google calendar is displayed correctly, you are now ready to publish the page.

Step 15: Publish your page

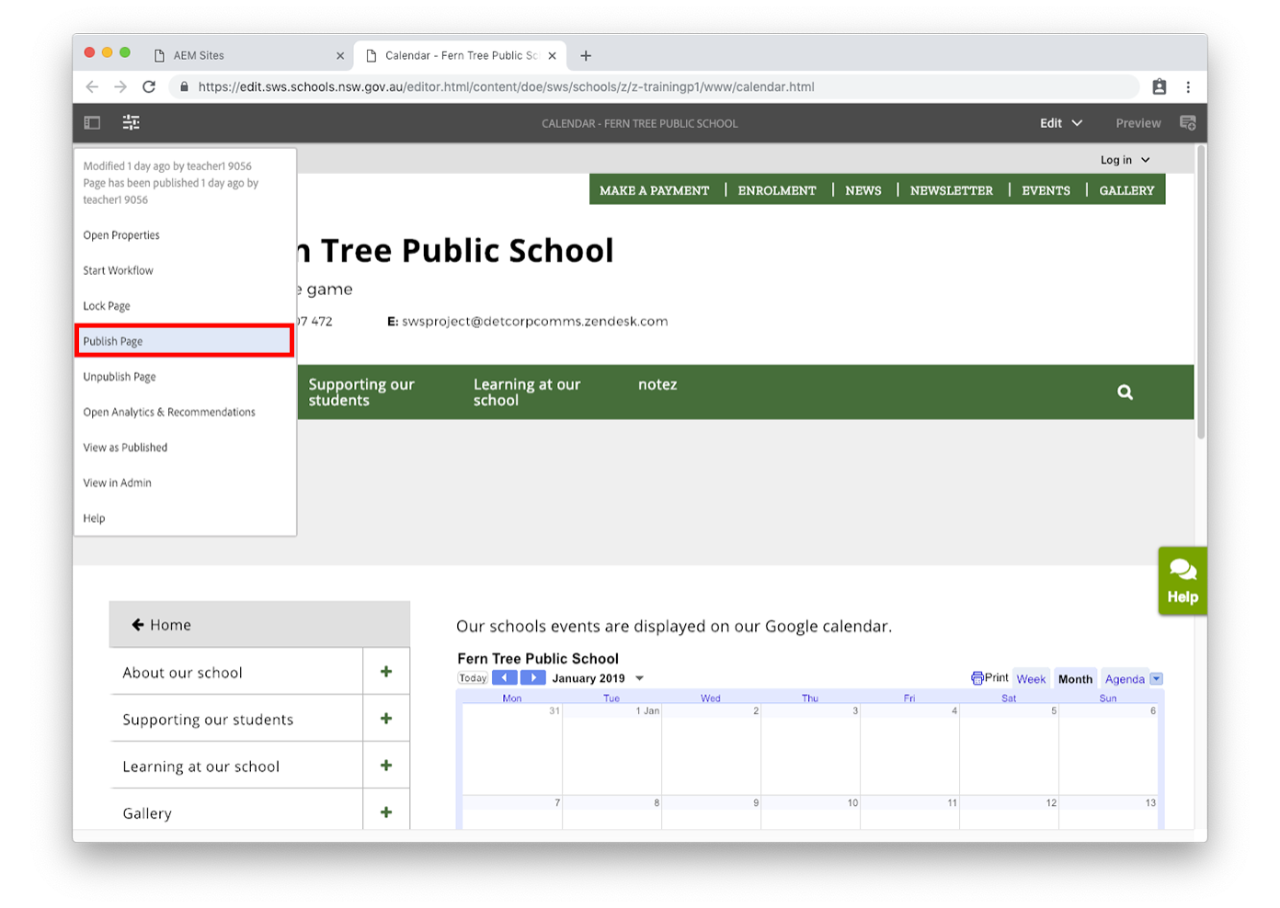
  • For changes to be updated on your live school website you will need to publish the page.
  • Select the slider icon in the top left corner. This is the Page Information button.
  • Select Publish Page from the drop-down. 
  • If you don't see Publish Page you are an Author and will need to select Start Workflow instead. Go to our Author publish a page for more information.


You may also find useful: